You're about to learn 5 super actionable blogging tips that will help you get more traffic, subscribers and online revenue (today). But first, let me say:
The last 6 months have been insane!
I flew to Australia for 3 weeks to attend my little sister's wedding (beard not included):


My wife and I laid new hardwood floors in the house:


I started a weekly SEO video series:

And quadrupled the revenue of my search marketing agency, hired two full-time employees and a VA.
Needless to say, the blog took a bit of a back seat.
BUT:
Despite the limited amount of time I've been able to dedicate to new content, I've still managed to increase organic traffic 15.57% across the entire site, quadruple organic traffic to targeted posts, and grow the email list from 600 to 744 new monthly subscribers:

While pushing the site over $5,000 in monthly affiliate revenue.
How did I do this?
More content? Nope - only published three new posts since August.
Ad spend? Not a penny.
Truth is:
I've managed to increase organic traffic, boost my subscription rate and generate more affiliate revenue using 5 blogging tactics that can be used in any industry, whether you're promoting affiliate offers or selling your own products/services online.
And, I'm going to walk you step by step through each one in this tutorial.
Ready? Let's get started.
What You'll Learn:
- How to jump from #8 to #2 in Google (overnight) and increase organic traffic 402%
- How to 7x your homepage email signups
- How to collect 4,876 emails with a single welcome offer
- How to double your email open and click-through rates (in under 1 minute)
- How to monetize your email list on complete autopilot
5 Advanced Tips for Blogging You Can Use Today
This is a monster 7,000+ word tutorial. You can use the jump links below to quickly navigate to the specific tips for blogging that are most interesting for you:
- Blogging Tip #1: Keyword Research for Existing Content (+ Relaunch Formula)
- Blogging Tip #2: Increase Subscriptions 709% with an Upside Down Homepage
- Blogging Tip #3: Collect 4,876 Emails (5.62% Opt-in) with a Killer Welcome Offer
- Blogging Tip #4: Get 101% More Email Opens (in Less than One Minute)
- Blogging Tip #5: Monetize Your Email List on Autopilot with "Smart Links"
Blogging Tip #1: Perform Keyword Research for Existing Content (and increase organic traffic 402%)
How do you get more organic traffic?
For most of us, the process looks something like this:
#1: Research some new keyword opportunities.
#2: Assess keyword relevance and competition.
#3: Slave for hours producing the "best" piece of content for a given topic.
#4: Build some links.
And, while each step is an important part of any SEO strategy...
It is NOT necessarily the best place to start.
Truth is:
You can get quick organic traffic gains without researching any new keywords, or writing new content.
How?
Leverage your existing assets.
And no, I'm not about to tell you to re-purpose your content into a video or slideshare presentation. I'm talking about squeezing more organic traffic out of the content you have already created.
Nothing groundbreaking.
But:
I'm always blown away by how many people fail to do it. This tactic is the first thing I look at when performing content audits or building SEO strategies for clients.
This tactic typically results in a 15-20% organic traffic gain within 30 days for established websites.
I recently used the strategy to take this SEMRush review from #8 to #2 in 10 days, and increase organic traffic to this blog promotion guide 402% in 30 days:

Pretty cool, right?
Let's see how you can do it on your site.
(If you want to see the results first, click here)

Before we get started, I have to give a HUGE shout out to my friend Nick Eubanks over at SEOAuv. His "Master Keyword Research in 7 Days" course opened my eyes to this strategy.
Choose the right data
When you're doing keyword research for an existing website there are 3 different data sources you can look at:
1. Analytics data
2. Contextual data
3. Rankings data
In this tutorial, we'll be looking at your "rankings" data - which keywords your site is currently ranking for, as well as those you have ranked for in the past.
SEMrush
There are only a few keyword research tools out there that will give you access to both historical and real-time rankings data. We will be using SEMrush in this tutorial.
Reader Exclusive: Get A Free Month of SEMrush Pro
To get access to all your rankings data you'll need to have a paid SEMrush account. I want you to be able to follow along step-by-step with this tutorial, so here is a link to get 30 days free access to a SEMRush Pro account.
OK, ready?
Step 1. Collect your rankings data
The first thing you need to do is find out which keywords you rank for.
Head over to SEMrush and enter your domain. Hit "Search".
From the “Domain Analytics” overview report, select the “Organic Research” tab:

You will land on the "Positions" report. It will show you all the keywords your site currently ranks for in the top 100 search results.
You can see my site has about 2,900 keywords ranking in the top 100 search results.
Scroll down the page and you will see the "Organic Search Positions" report:

This table contains a bunch of valuable keyword metrics, including:
- Organic search volume
- Rank change data
- CPC data from Google AdWords (indicator of commercial intent)
- URL ranking for each keyword
- Percentage of organic traffic each keyword is driving to your website
- Keyword difficulty metrics
- Annual search trends data
- Real-time SERP snapshots

Step 2. Export your rankings data
You've found all the keywords your site currently ranks for.
Now what?
You need to get actionable insights from the keyword data.
The first step is to get all the keywords into a spreadsheet where you can slice and dice the data (I'll show you how to do this below).
In the top right corner of the Search Positions Report click the "Export" button:

Select the "Excel" data format.
SEMrush will transfer all the keyword metrics into the exported spreadsheet:

You'll notice the spreadsheet columns align exactly with the headings shown in the "Organic Search Positions" table in SEMRush.
Step 3. Filter your keyword data
By now you have an excel spreadsheet containing hundreds or thousands of different keywords.
How do you make sense of it all?
Filters.
Here's how to do it:
Click the "Filter" button in the top navigation of your excel spreadsheet:

This will add a dropdown to the top of each column.
Click the drop down arrow at the top of the "Search Volume" column and sort the data from largest to smallest.
This will give you a list of all the keywords your site ranks for in the top 100 search results, from highest to lowest search volume:

Now:
There is a TON of data here. But, it's not really actionable yet.
Important: Search volume isn't everything at this point in the process. You need to filter out all the high volume keywords you already have top 20 rankings for.
Targeting a keyword with 1,000 monthly searches ranking on page 8 is not a quick organic traffic opportunity:

To uncover the "quick wins" you're going to need to layer on some additional filters.
Whenever you're playing with large data sets, always use visual formatting to highlight focus areas.
Here's what to do:
Click the "Positions" tab.
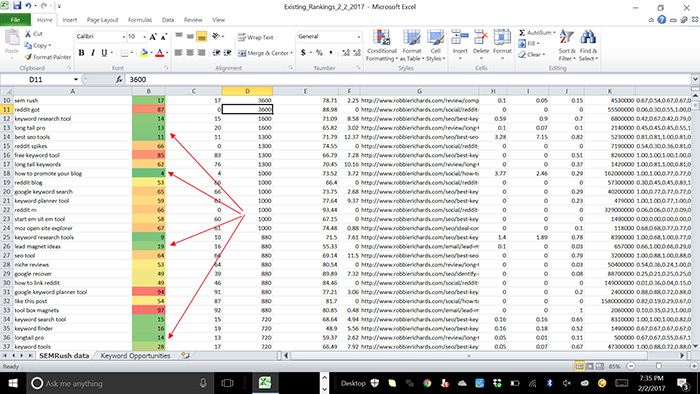
Head back over to the “Home” tab and click “Conditional Formatting”. Select the “Color Scales” option and choose the “Red – Yellow – Green” scale:

This filter will add a visual heat map over the data allowing you to quickly hone in on your ideal keyword prospects.
You'll see the greatest organic traffic opportunities, along with the keywords that have the highest existing rankings:

This is your low hanging fruit - the highest volume keywords you already rank for in positions 6-20.
These are the areas where a small ranking improvement can generate big organic traffic gains.
Author's Note:
Don't be blinded by green cells and large numbers.
Some of the keywords in the filtered data set may not be realistic targets, or relevant to your business.
For example:
“Reddit star trek” is a search phrase that gets 8,100 monthly organic searches, but I have no interest in ranking for it.


On the other hand, there are phrases like “keyword research” that are super relevant to my website, but I will not be able to realistically rank for that keyword any time soon, if ever.
You want to find keywords that require minor updates and promotion to immediately move the needle.
Ok:
Once you have the visual formatting in place, the next step is to build a shortlist of realistic keyword targets...
Step 4. Find your quick wins
This is where you start digging for gold.
In this step of the process you want to find keywords that meet the following criteria:
- Relevant to your business - will attract your target audience.
- Rank positions 6-20 - already have some authority to build from.
- At least 300 monthly searches - threshold will be higher or lower depending on the niche.
Now:
Create a new tab in your spreadsheet titled "Keyword Opportunities". Paste the headings from the top of the first tab:

Next, start manually reviewing the keyword set using the criteria mentioned above. Add any qualified keyword prospects to the "Keyword Opportunities" tab.
The conditional filters will make this part of the process MUCH faster:
In the spreadsheet, all the keywords ranking on the first 3 pages are highlighted in green.
As you scroll down the list, instead of looking at each individual keyword, only pay attention to the ones highlighted in green.
In seconds, you'll have a bunch of solid keyword targets.
For example:
This blog currently ranks #9 for the keyword "lead magnet" which gets 590 monthly searches:

First page. Awesome, right?!
Nothing to snuff at.
But, here's the kicker:
Over 2/3 of the SERP clicks go to the top 5 search results:

While I am already on page one, I'm still missing out on a LOT of potential organic traffic.
So, a small bump in rankings will produce a large spike in organic traffic to that piece of content.
Since the keyword is relevant, already has a solid ranking and meets the minimum search threshold we outlined above, I'll copy and paste it into the "Keyword Opportunities" tab:

Rinse and repeat.
After just a couple minutes, I managed to find five more golden green opportunities:
"lead magnet"
"best seo tools"
"how to promote a blog"
"link building strategies"
"seo copywriting"

Awesome, right?

Step 5. Scaling the process for monster keyword sets
Here is a common question I get about this blogging tactic:
What happens if you have a keyword set with hundreds of thousands, maybe millions of keywords?
Even with conditional formatting, sorting through gigantic keyword lists is extremely tedious and time consuming:
No need to panic.
There's a quick workaround for this.
Head back to the spreadsheet and click the "Positions" tab. Deselect all the numbers, and then re-select all the number between 6 and 20:

This simple filter will help you focus in on the "lowest" hanging fruit - keywords you already have content ranking for on the bottom of page one, or page two.
Note: For newer sites, the 6-20 filter may only return a handful of keywords. If you want to expand the size of the keyword list, set the filter to 6-30.
Don't go any broader than that.
Content ranking outside the third page will typically require a lot more optimization and promotion to move onto the first page.
Step 6. Prioritize your shortlist
Remember:
The goal is quick organic traffic gains.
You only want to focus on keywords that can get fast ranking improvements. This means going after the keywords with the lowest level of competition.
There are many ways to approach this. I'll cover my 3 favorite tactics below.
1. Use SEMrush competition data
Click the "Keyword Difficulty" dropdown in the "Keyword Opportunities" tab and sort from lowest to highest competition:
The keyword difficulty index (from 1-100%) shows you an estimate of how difficult it would be to rank in the Google or Bing top 20 for a given keyword.
The higher the percentage the more difficult it will be:
Above 80%: Extremely difficult keywords to rank for. You'll be competing with high authority sites, and will likely need to invest a lot of resources to ever have a chance of cracking the first page.
From 60-80%: Still a high degree of difficulty. However, with great content, promotion and ongoing link building you'll have a fighting chance, especially as your site's authority increases.
Below 60%: Easier to rank, but often harder to find. With quality content and a solid search strategy in place, these keywords are very attainable.
The competition threshold you can target will depend largely on the existing domain authority of your website.
General rule:
For newer sites - begin targeting keywords with a difficulty score below 60%.
Established sites - keywords with a 60-80% difficulty rating are attainable:

2. Look closely at Domain Authority
Here's the deal:
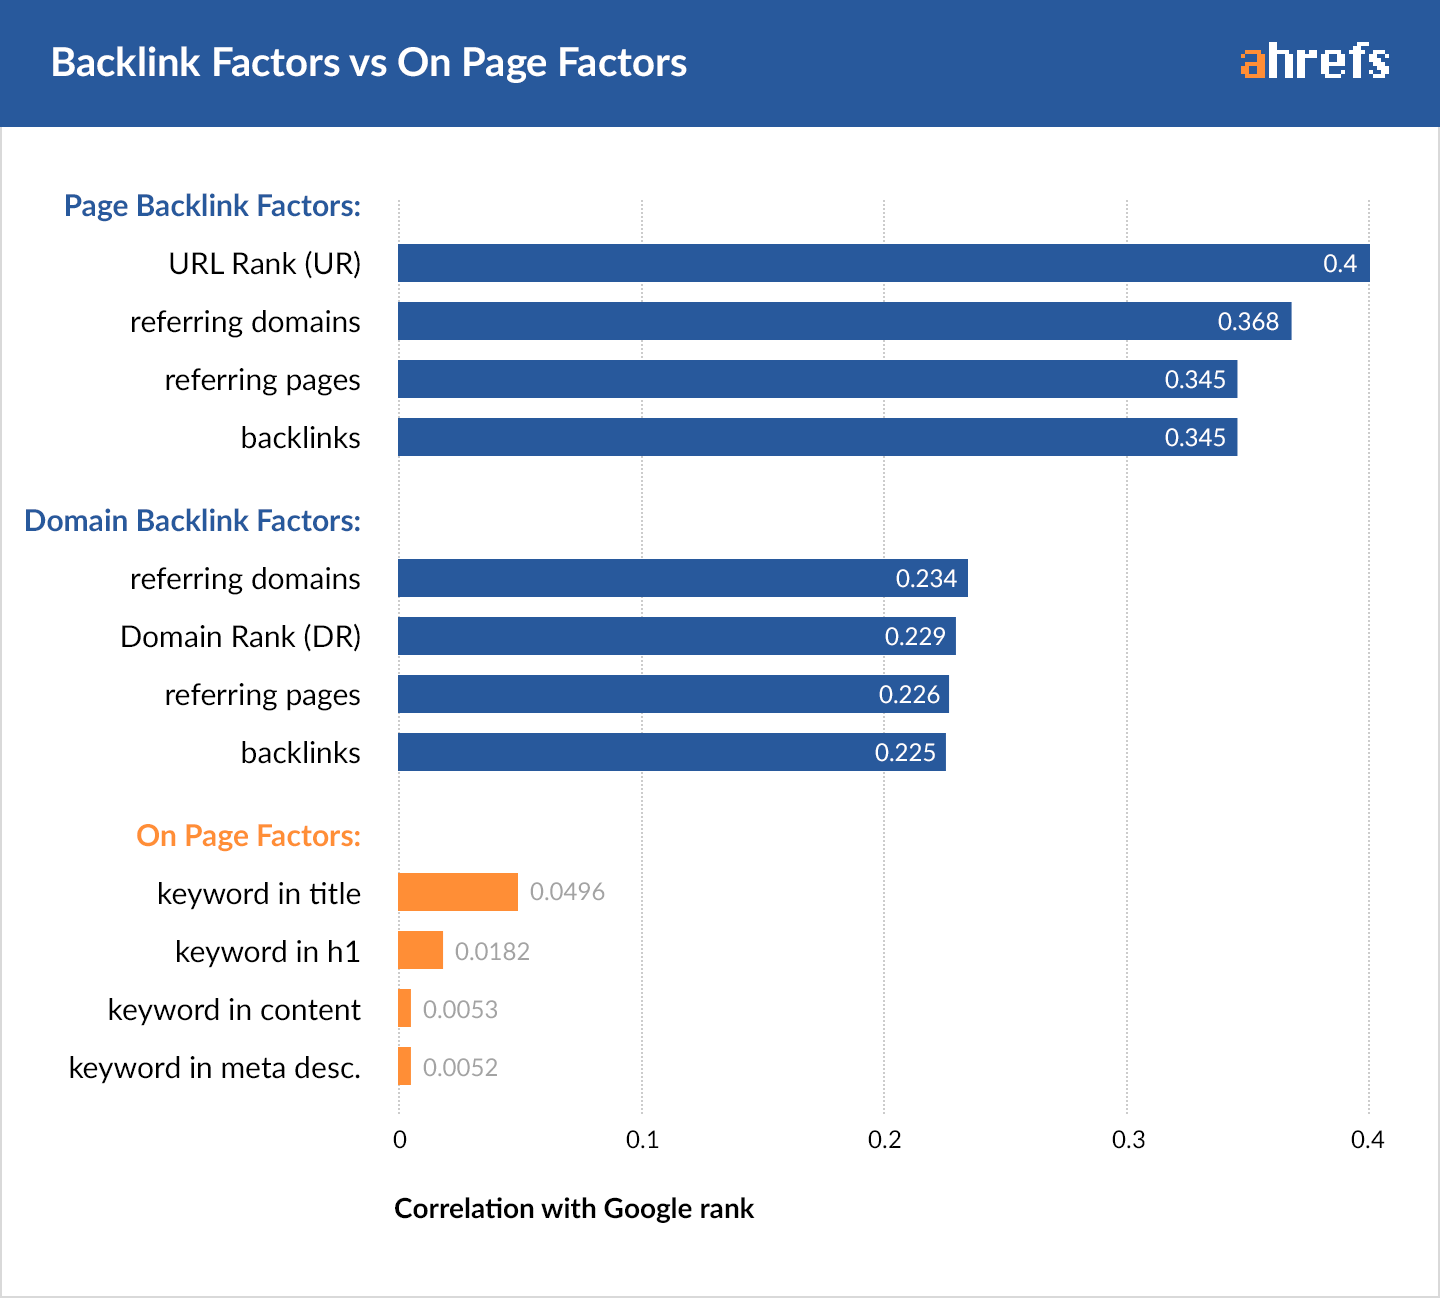
The #1 factor when it comes to ranking for a given keyword is domain and page-level authority. This metric is driven by the number and quality of backlinks pointing to a given URL.
Ahrefs conducted a study of 2 million keywords and found that backlinks continue to be the single biggest SEO ranking factor:
One way to assess both domain and page-level authority in the SERPs is to install the Ahrefs SEO toolbar chrome extension.
Run a search for one of the keywords from your "Keyword Opportunities" tab:

You will be able to get a quick snapshot of your top competitor's SEO metrics, including the number backlinks, referring domains, and URL ratings.
How do you interpret these numbers?
You need a baseline.
Open a new browser tab and enter your domain. Look at the domain rating (DR):

I recommend targeting keywords where the top ranking results fall with 5-10 DR points of your existing page.
Anything higher than that will usually require a lot of link building to move the needle.
Author's Note:
While domain and page ratings are great barometric data points to look at when assessing keyword competition, I also like to pay close attention to the number of "referring domains (RD)" pointing to competing URLs.
Sometimes, sites with a comparable domain rating can be hard to knock off if the competing pages have a lot of links pointing to them.
4. Long Tail Pro manual keyword assessment
Long Tail Pro provides a great feature in it's new cloud application called "manual keyword entry". Basically, you can enter up to 2,000 keywords and tool will go and out pull detailed SEO metrics from Majestic SEO for each keyword:

As well as the sites ranking for each keyword:

Similar to Ahrefs, you can see the number of referring domains, along with domain and citation scores.
If you want to learn more about how to accurately assess competition using these data points, I wrote a monster review of Long Tail Pro here.
Ok:
After looking at SEMrush competition metrics, assessing domain authority and looking at the link profiles of competing content you will have all the data you need to determine whether it makes sense to target a given keyword.
For example:
About 6 months ago performed I used this keyword research process to find a ton of low hanging fruit:

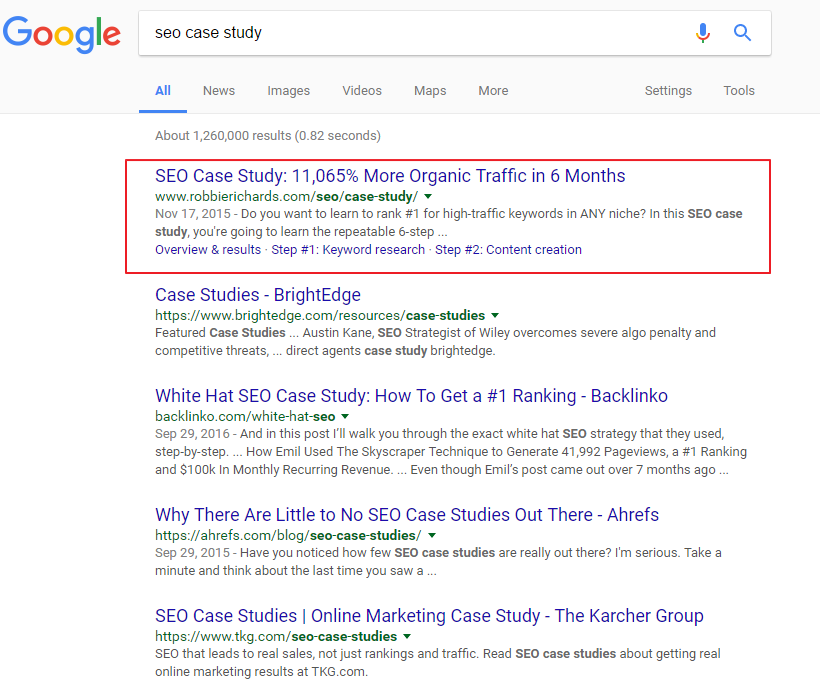
After using the steps outlined above to analyze the SERP competition I found that it was a realistic goal to make it into the top 3 positions for the term "SEO case study" with a content refresh and some hard promotion.
And, I did (in less than a week)...
BEFORE:

AFTER:
Pretty cool, right?
This is how you can do it too...
Step 7. Optimize your blog content for better rankings (and traffic)
By now, you've:
- Identified all the keywords you rank for
- Filtered the list to keywords ranking in positions 6-20 (low hanging fruit)
- Assessed the competition level for each keyword
- Produced a shortlist of immediate organic growth opportunities
Now it's time to jump in, bump those rankings and land more organic traffic 🙂
Note: This process of optimizing old content to get more organic traffic was inspired by the team over at HubSpot who used the strategy to boost organic traffic to existing content 106%:

The Simple 5-step Process I Use to Boost Rankings for Existing Blog Content (Overnight):
A general rule of thumb:
When identifying areas for optimization in your existing content, look at the following:
1. Publish date - make sure it's updated every 6-12 months
2. Depth - with over 2 million blog posts published every single day, you need to be auditing the competition every 6 months to make sure your content is still king.
3. On-page SEO - make sure your content has a strong topical focus across key on-page elements - titles, headers, LSIs, media, alt text and internal links.
4. Links - analyze the link profiles of your top competitors and model their strategies.
5. Behavioral signals - user experience optimization (UXO) is the future of SEO. More attention needs to be given to content formatting, media types, copywriting principles, and other factors that reduce bounce rate, improve time on site and bolster user engagement.
Speaking of user engagement...
Step #1. Reformat for greater engagement, rankings and traffic
When it comes to creating highly shareable content that keeps people glued to the page, there are few things more important than formatting.
Attention is a scarce resource, especially online. This Microsoft case study revealed the average human attention span is less than that of gold fish - dropping from 12 seconds in 2000 to just 8 seconds today.
Bottom line:
If your content isn't visually appealing, readers will leave.
No shares.
No email signups.
No purchases.
Just a lot of time and energy wasted putting together what could very well be a great resource, that never gets the attention it deserves.
User experience signals such as bounce rate and dwell time are now becoming a more heavily weighted organic ranking factor:

Take a look at the examples below and let me know which one is more visually appealing:

Both images contain exactly the same content. One of them is easier to read, and grabs the eye much faster. Which article do you think keeps readers around longer?
Author's Note:
The tool I used to reformat all my content and improve reader engagement is called Thrive Content Builder. If you have any questions about the tool please leave a comment below the post.
Make your content scannable
Most people will scan and only read 20-28% of your content.
So:
You need to make it incredibly easy for readers to find the content that interests them.
A couple ways to do this:
Include a Table of Content with jump links:

Include eye-catching subheadings:
Take a note from legendary copywriter, David Ogilvy:

Most readers will qualify your content by scanning the subheadings in your article.
So:
You want to write subheadings that make your readers go "Wow! There is a ton of value in this blog post, I better read it right now".
One of the best ways to do this is use benefit-driven headlines that clearly captures the value of each section of your content.
For example:
This subheading immediately captures the benefit (value) you will get by reading that section of the post:

Subtle on-page tweaks like this will keep readers scrolling down the page, increasing dwell time and engagement. These user signals will give your content an upper leg in the SERPs, all else equal.
Bonus tip: Include benefit-driven jump links in you table of content to engage readers as soon as they land on your page:

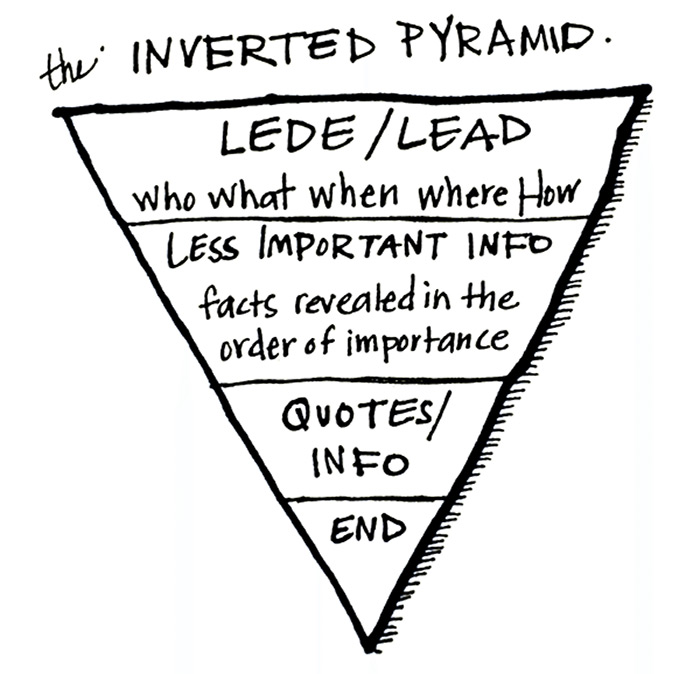
Include shorter paragraphs:
Shorter paragraphs make your readers feel like they're moving through the content quicker, giving them a sense of advancement.
The inverted pyramid copywriting principle will help you get right to the meat of the content.
This graphic from the team at CoSchedule captures it well:
Include pattern interrupts:
Don't write blog posts that look like Wikipedia articles...
Unless you are Wikipedia. Enormous walls of text will quickly tire your readers:

Outside of subheadings, shorter paragraphs and media, another handy blogging tactic is using "pattern interrupts" to engage readers.
Instead of hitting people with paragraph after paragraph of text, you throw out a short 3-4 word sentence or visual that "interrupts" their normal reading cadence.

Here is another example of a pattern interrupt I use to engage blog readers:

By mixing up the flow of your content, readers are forced to shift gears, keeping them engaged longer.
For more actionable copywriting tips, check out this tutorial.
Use visual media
Some good advice from my friend Noah Kagan:
Try and include a visual for every 100 words of copy.
 Noah Kagan
Appsumo/ Sumome
Using images to break up text is a great way to keep the reader engaged.
Which image types perform best?
The team at Quicksprout did some research and found out that animated graphics were the most shared image types:

Use video content
A lot of people prefer to digest content in a visual format.
And nothing works better than video.
Consider including videos at the top of your content, or in key sections, to provide readers with another channel to consume the content:
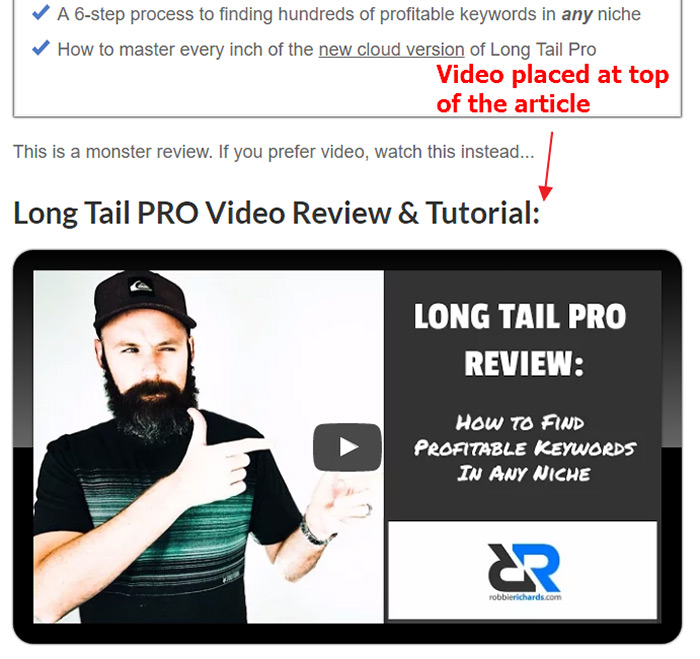
That video already has almost 1,500 views:

Make your content shareable (at all times)
If you want to amplify your content, make it as easy as possible for people to share it at all times, without pissing them off.
Here are a few simple ways to do this:
Use the free SumoMe Share app to include a sticky widget on left side of page:

Make the share buttons scroll at the bottom of the screen on mobile devices:

Add sectional share links for each tactic in long form list posts that populate custom messages:

Update tactics and screenshots
Think of ways you can update existing content to make it more actionable, current and in-depth.
Following the keyword research exercise outlined at the beginning of this post, I decided to add 13 new blog promotion tactics to this post.
And, updated UI screenshots and covered new product features in this review:

What ways can you expand on and improve your existing assets?
Use this technique to really boost the performance of your content.
Add bonus content
Readers LOVE bonus material. It's almost like a buy 2 get 1 free deal.
Level up your content with "Action Items":

Editor/ author notes:
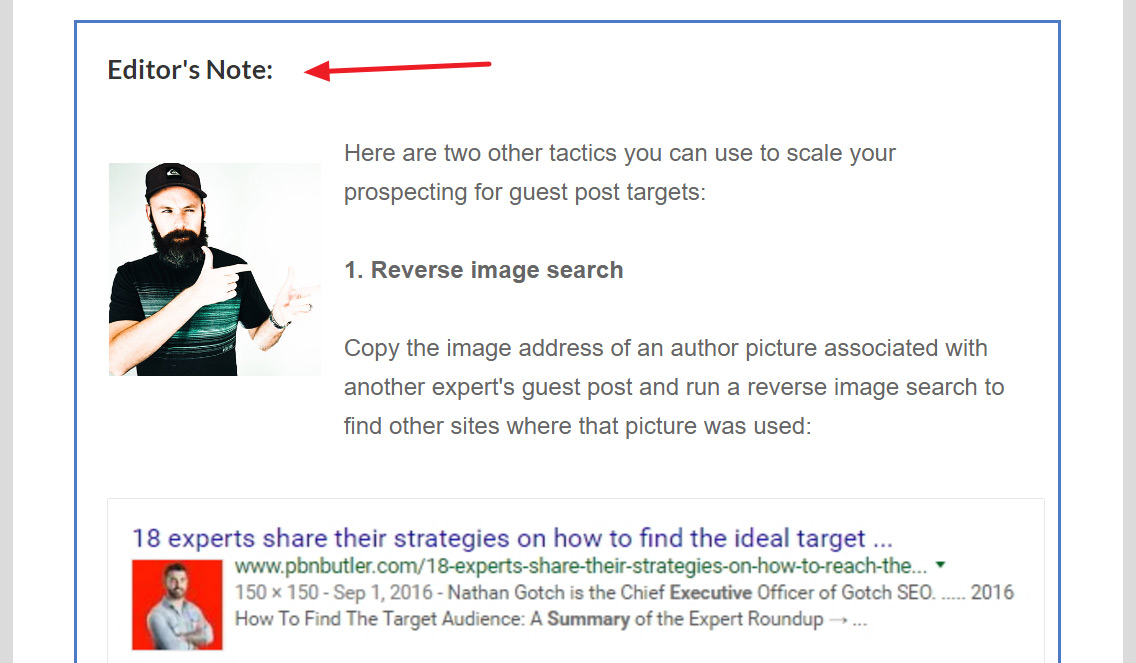
And expert opinion.
All quick additions that can have a big impact on your existing content.
Make people feel like they are getting way more value than they expected, and you'll not only win more social engagement and links, but repeat readers too.
Relaunch your content
Now that your content is 5x better, it's time to share it with the world.
First, you need to change the publish date
This is HUGE.
When you change the publish date of the post it will show at the top of your blog reel. This gives the post immediate visibility to anyone landing on your blog page.
Here's how to do it:
Click edit next to the post and change the publish date to today:

Done!
Second, outreach to your advocates
As a blogger, you know how important it is to have a solid content promotion strategy.
Without it, no one will ever see your content.
One of the best ways to promote your content is targeted email outreach.
Use a tool like the Ahrefs Content Explorer to find people who have shared your post in the past:

And reach out to them with an email like this one:

Because your messaging is laser focused people will happily share the content:

Third, analyze your competitor link profiles and set up alerts
As you've already seen:
Backlinks are a driving catalyst behind the speed at which your content climbs the SERPs.
So:
You'll need to find some quick wins.
One of the best ways to find easy link opportunities is to fire up the Ahrefs Site Explorer and look at where your competitors are getting links:

What strategies are they using to acquire links?
Guest posts? Write a few.
Roundups? Run some outreach.
Contextual links? Send an email and tell people about your content.
Repeat the process for 5-10 competing articles.
Once you've exhausted those opportunities set up link alerts for a handful of the competing URLs:

As soon as competing posts land a link, reach out to the webmaster and let them know about your "better" piece of content.
Fourth, share it across your social media channels
Pin the content to the top of your profiles:


And make sure people know it's a new and improved version of your original content.
Finally, add it to a social automation queue to give it repeat exposure over the next 30 days:

Very simple tactics that have helped me generate over 25,000 shares and 44,000 social media referral visits with 25 blog posts:

Note: I've spent less than $250 on paid social media promotion across the life of the blog.
Fifth, send it out to your email subscribers
Your subscribers are going to be your most loyal and engaged audience.
Get the updated content in front of them ASAP!

The Results
Results speak louder than words.
Let's take a look at a couple examples from posts I put through the process outlined above.
Case Study #1: SEMrush Review
Back in 2014 I wrote a monster 7,000 word review of SEMrush.
At one point the article was ranking #4 for it's target keyword "semrush review", and top 10 for a number of other higher volume branded search terms.
After performing the keyword research exercise shown above, I noticed the blog post had dropped to position #8, and organic traffic was steadily declining.
So:
I ran through the 5-step relaunch sequence shown above. In 10 days the post jumped from #8 to #2:

Resulting in a 73% month-over-month increase in organic traffic to the article:

Not bad, right?
Well:
I wanted to see if I could scale this blogging tactic across other posts targeting more competitive keywords.
Case Study #2: How to Promote Your Blog Post
After the success of the SEMrush experiment, I decided to apply the exact same process to a more competitive keyword like "how to promote your blog".
The keyword gets 1,600 monthly searches:

And is targeted by some of the biggest sites in the world:

Now:
Some of you might be thinking, you're mad for going after a keyword with sites like HubSpot, Shopify and Forbes on the first page of the SERP.
But, here's the deal:
Back in the beginning of 2016, the post was ranking #6 for the search term, driving a nice stream of organic traffic to the blog:

The post had been shared over 3,900 times, and boasted a very healthy link profile. The foundation was solid!
But:
After performing the keyword research exercise back in June, I noticed the post had slid all the way off the first page into position #11.
And the traffic reflected this:

A 35.55% drop in organic traffic quarter over quarter.
So:
I used the relaunch sequence highlighted above, and republished the post on July 11. And, the post jumped from #8 to #2 overnight!
This increased organic traffic 402.43% in the next 30 days:
BOOM!
Blogging Tip #2: Increase Subscriptions 709% with the Upside Down Homepage
More of a visual learner? Here is a video that walks you through creating an upside down homepage from scratch in under 10 minutes:
Which page on your website gets the most traffic?
For most people, it's the homepage.
I'm no different:

But, where was I sending all this traffic?
To a generic page that looked like this:

A single sidebar opt-in...
Converting at a dismal 1.20%.
HUGE waste!
I was leaving hundreds of potential email subscribers on the table.
That was until I came across an article by Bryan Harris outlining how he used something called the Upside Down Homepage to increase the number of subscribers to his blog by 35%:

And, he wasn't the only one crushing it with this design.
Jeff Goins collected 2,500 subscribers with the design:

Andrew Warner collected 1,200 new email subscribers with the page:

This is what Bryan's Upside Down Homepage looks like:

Over and over again the page design had proven to be a winner for bloggers and business owners.
So I decided to launch a simplified version on www.robbierichards.com:

The page shown above took me less than 10 mins to build with Thrive Content Builder, and resulted in over 7x the homepage conversion rate:

That's almost 100 additional email subscribers each month!
Plus, I've used the page to drive traffic into this campaign landing page for my search marketing agency:

Generating dozens of qualified leads:

With several of those leads closing and adding over $15,000 in monthly consulting revenue to the business.
Ready to 5x your home page signups?
I'm going to break down the core elements of the upside down home page below, but if you prefer video, watch Bryan Harris explain it here.

Section 1: Above the fold
Peep Laja, from ConversionXL, found that content above the fold still gets 80% of our attention.
Bottom line:
The top of the page should be dedicated to one thing: getting the viewer to convert.
By making the offer the first thing people see on the page you dramatically increase the chances they will take action:

Clicking the green CTA button triggers a Thrive Lead Box to collect opt-ins:

Pro Tip:
Don't just pick any random above-the-fold CTA.
Find the most popular blog post on your website and use the title of the blog post as the CTA headline.
Section #2: Social Proof

By showing the types of sites you have been featured on, or clients you have worked with, you can instantly build credibility and trust with the reader.
Section #3: The Road Map
I didn't include this section in my original page design, as I decided to take a more streamlined approach like Jeff Goins.
Basically, the Roadmap section allows your readers to select which stage they are in your funnel.
You can see how Bryan used it on his site below:

This is a brilliant way to segment your audience, which is critical as people are 56% more likely to buy with a personalized experience.
For example:
Bryan knows that anyone clicking the "Grow Your Email List" CTA is a perfect candidate for his free course "Audience from Scratch".
Anyone who opts into that course will eventually be upsold into his 10K subscribers course.
Other the other hand, someone who opts into his "Launch Your Product" is probably further along the entrepreneurial path and would be a great candidate for his personal coaching program.
Section #4: The Pilot Story

I think this quote from Bryan sums up the purpose of the Pilot Story perfectly:
The job of that pilot episode is to hook viewers with a compelling story and get them to watch the next episode. The exact same thing is true of your home page. The #1 goal of your home page is to capture your visitors’ attention and get them to keep reading.
 Bryan Harris
VideoFruit
The pilot story framework can be broken down into 4 simple sections:
1. Share the result
2. Share the problem
3. Agitate the problem
4. Offer a small solution
This is the exact formula Bryan uses in his 7-figure email launch sequences.
Section #5: Call to Action
The final call-to-action should tell readers what to do next.
Bryan recommends taking a little extra from the Pilot Story and offering it to readers as a form of content upgrade.
For example:
In his Pilot he talks about the strategy he used to get 25% more traffic.
The final CTA is getting access to the formulas he used to do that (plus bonus tactics):

I'm testing a slightly different approach. Instead of offering another opt-in offer at the bottom of the page, I give the reader the chance to either find out more about my SEO services, or read the blog:

Section #6: Navigation
This is where the page gets it's name.
Most websites place the navigation links at the top of the page. This template does the exact opposite, placing them in the footer:

In the words of a modern Shakespearean entrepreneur:
To convert or not to convert?
That is the ONLY question readers should have to answer when landing on this page 🙂
Blogging Tip #3: Collect 4,876 Email Subscribers (and Get a 5.62% Opt-In Rate) with a Killer Welcome Offer
Want to put your list building on steroids?
Good news:
I'm about to show you the tactic I used to increase my sitewide opt-in rate 53%...
Taking the growth of my email list from 476 to 744 new email subscribers a month:

The best part:
You can launch this strategy for free, in under five minutes using the SumoMe Welcome Mat to show all visitors a full screen call-to-action.
Here is what it looks like:

Simple.
And the results speak for themselves:

The Welcome Mat is converting at 5.62%, and has added 4,876 new subscribers to my email list:
How to create a Welcome Mat in less than 5 minutes, for free
Here's what you need to do:
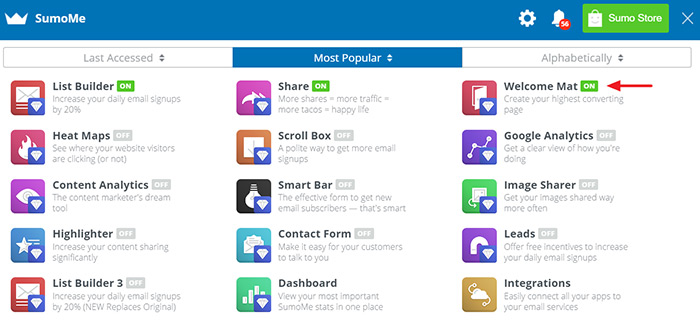
First, if you haven't already, install Welcome Mat on your site (it's 100% free to get started).

Second, activate the Welcome Mat:
Third, create a campaign, select one of the templates:

Fourth, add your design and messaging:

Fifth, select which pages you want the Welcome Mat to display on:

Note: With the free version you'll only have access to two different template designs, and won't be able to run A/B tests.
Pro Tip: Scale the Welcome Mat Strategy
Most people install the Welcome Mat and target it to all the pages on their site.
This alone will help you increase the opt-in rate.
But, if you really want to step it up a level, follow this simple process:
Open Google Analytics and navigate to the Behavior >> All Pages report:

This will show you the highest traffic pages on your site.
Make a list of the top 5 pages in a spreadsheet.
Create a content upgrade for each post. This can be as simple as converting the blog post into a PDF using this free tool.
OK:
It's time to address the elephant in the room:
What if building an email list isn't your #1 priority?
You can use the Welcome Mat to grow your business in a number of different ways:
- Collect emails before a product launch
- Promote special offers or affiliate promotions
- Send more traffic to high-converting product pages
Here are a couple examples:
Mike Schwartz at Ribbed Tee used it to send targeted traffic to product pages, and increased revenue 42%:

And Sujan Patel used a Welcome Mat to collect over 100 pre-orders and double daily sales leads:

You can use Welcome Mats to support any business or blogging objective.
Blogging Tip #4: How to Get 101% More Email Opens
(in Under One Minute)
I got this tactic from my friend Noah Kagan over at SumoMe.
He calls it "Double-Opens".
If you have an email list, it's the single easiest way to drive more traffic to your website.
What is your average email open rate?
I used to think anything over 20% was good. Higher than 30% and I was killing it.
I'm guessing many of you are in the same boat.
The reality:
Even if you have an amazing 50% email open rate, it still means 50% of your subscribers are NOT OPENING your emails.
In the words of a very wise sumo-ling:

Why on earth would you settle for only 1 out of every 2 people reading your emails?
You tell em' Noah!
After all, you worked hard to get all those subscribers. Don't let the blood, sweat and tears go to waste.
Use this simple process to increase email open rates 101% in less than a minute
Last year I emailed my list a case study showing 25 tactics I used to go from zero to 4,476 email subscribers.
Here's how the open rate looked:

Not bad, right?!
Depends how you look at it.
See:
Over 69% of the people on my email list DID NOT open the email.
So, I decided to use Noah's little Double-Opens strategy and it got me 61% more opens.
The best part, it only took me 1 minute of work to set up!
Here's how to do it:
Step #1: Take the same email you sent and only change the subject line.
Step #2: Email it out one week later ONLY TO YOUR NON-OPENERS.

The results:

21% more total opens which is 61%+ more opens than if I did nothing.
1 minute of work = 691 more people read my email.
And, an extra 166 people clicked through to my website.
Crazy right?!
This simple tweak will INSTANTLY boost your open rates and drive more traffic to your site.
Since first running the experiment I've started applying it to nearly all the emails I send (not including autoresponders).
Last year, I relaunched my blog promotion tutorial using the tactics listed in the first blogging tip.
I sent the first email to my list on July 12:

About average.
Then, I resent the same email on July 21st with a different subject line:

By just taking a minute to segment the non-openers, change the subject line and reschedule the email I was able to increase both the open and click-through rates over 100% and send an additional 300 people to the post.
If you have an email list, this is the EASIEST way you can get more traffic TODAY!
Author's note:
If you have sent an email in the last 4 weeks, go into your email email service provider, change the subject line and resend it to all the non-openers.
Let me know how you did in the comments below.
Blogging Tip #5: Monetize your email list on Complete Autopilot with "Smart Links"
Email subscribers are the lifeblood of your online business.
They are loyal return visitors, highly engaged fans, and your most valued customers and clients.
In other words, they are your main income source.
Despite this:
99% of you are making one BIG mistake.
You show the same content to existing subscribers that you do to new visitors.
The subscriber returns to your website and sees the same opt-in forms and offers for things they've already signed up for.
Not only is this redundant, it interrupts your most valuable audience.
Enter Smart Links.
Smart Links is a feature of the Thrive Leads plugin (read full review here). It gives you control over what type of content new visitors see, compared to what type of content existing subscribers see.
Here is a quick breakdown from Shane MeLaugh, the founder of Thrive Themes:
There are two main use cases for Smart Links:
1. Restrict opt-in forms from showing to people who have already subscribed to your mailing list.
This allows you to show subscribers clean content pages with zero interruptions or distractions.
Basically, you stop asking your subscribers to subscribe 🙂
Normal link:

What subscribers see after clicking a Smart Link in one of your emails:

Much cleaner.
You can configure this setting site wide, or only for specific posts on the site:


Why would you only hide forms on specific posts?
One reason would be to use different lead magnets to segment your audience into different lists.
For example:
I might want to get someone who opted into my keyword research list to also opt into my link building list segment so I can promote my link building course.
In this case, it makes sense to show opt-in forms to a target subset of my subscribers I know are interested in SEO-related content.
Starting to get ideas yet? 🙂

Because the second use case is MUCH more powerful...
2. Show an alternate version of your forms to existing subscribers
This is where things get REALLY interesting (and powerful).
Thrive Leads allows you to create an "Already Subscribed" state for each opt-in form targeting a specific post or page on your site.
For example:
When a new visitor lands on the page, this is what they see:
And this is what an existing subscriber sees:

Now the subscriber sees a relevant sidebar offer, instead of the same redundant opt-in form.
Showing subscribers a redundant offer is bad.
Showing subscribers no offers is better.
Showing subscribers a relevant upsell or exclusive promotion is SMART 🙂
The possibilities are endless with this feature. You can use it to upsell products, promote special subscriber discounts, or promote relevant affiliate offers to specific segments of your audience.
Speaking of affiliate offers...
How to generate passive affiliate income with Smart Links
I started using Smart Links 12 months ago to promote a handful of affiliate products to targeted segments of my email list.
Here is a screenshot from just one of the affiliate products I promote on this blog:

(Note: Smart Links do not account for all the affiliate conversions shown above. Review posts, tutorials and video content also drive a large number of these signups).
Let's take a closer look at some examples:
Last year I wrote a monster SEMrush review. Any new visitors landing on the post would see this popup:

And this sidebar offer:

A highly relevant content upgrade.
Anyone downloading the ebook was automatically added to my SEMrush list segment:

Each subscriber then went through a series of case studies and tutorials showing them how to effectively use the tool to build SEO and PPC campaigns.
I included Smart Links within each email in the autoresponder series.
Since everyone on that segment of the email list downloaded my 10,000 word SEMrush playbook, I knew they are very interested in the product.
As a result, whenever a subscribers clicks through from one of the emails in this series they see the following subscriber promotion:

Instead of showing them the same ebook offer they already downloaded (or nothing at all), they see an exclusive 30 day free trial offer.
Anyone interested in getting access to all the tool's features and following along step-by-step with the tutorials can do so risk-free.
A laser focused offer geared towards increasing affiliate signups.
Here is another example:
When a reader lands on my list building case study they will see this popup shortly after page load:

After downloading the ebook and watching the video tutorial they are added to a list building segment.
Subscribers are moved through a series of tutorials designed to help them increase online traffic and grow their email list.
Instead of seeing the same ebook offer, they are shown a link to click through to learn more about the tool I used to collect over 10,000 email subscribers in 16 months:

Smart Links is one of the tools I've used to generate over $11,000 in affiliate revenue from that product:

The best part?
That's just one simple use case.
You can also use Smart Links to promote product discounts, upsell, cross sell or even drive traffic to a related product launch page. Your creativity is the limit. Check out the tool here.
Which blogging tips are you going to use in 2017?

If you made it all the way to end of this post give yourself a pat on the back.
You are now armed with a shortlist of super actionable blogging tips that will deliver BIG results for you in 2017.
Follow this guide step-by-step and you'll be landing more traffic, subscribers and customers.
Have a question about any of the tactics shown above?
Let me know in the comments below.
